Home > Steve > Go > Problem of the month

This is a continuation from February 1996's
problem (which I have gotten solved after 6 months!).
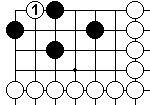
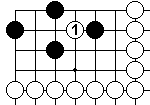
White 1 in Dia 1 is an incorrect White attempt to kill Black outright.
Similarly for White 1 in Dia 2 and for White 1 at A, B, C, D & E.
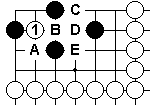
How does Black answer these incorrect White attacks?
This simple problem is amazingly complex. Having solved it once, I have now gone back and have started to record which moves work, which don't and the counters to bad moves.
I have done this using YAGO 0.9 along with a Basic program to modify the move numbers so that, for example, the third move is always move number 3, regardless of how many variations are involved.
I have also endeavoured to keep "correct" moves in the straight-through paths and put wrong moves in the variations.And this 17KB file is available as an Ishi format file, Diamond.go.
I do not claim these answers are 100% correct - I have been working
them out myself and so there may well be flaws.
If you find any please let me know via E-mail: steve@stocton.org.
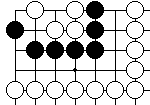
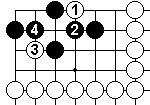
Dia 3 may look like a seki, but it isn't because Black can't force
White to complete the dead "gun" shape.
Instead White can remove all the outside liberties and then atari from
inside using the internal point as a liberty. (Play it out yourself to
see.)
This was "Common Situation 1", but I changed its name as it
isn't that common!
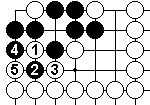 Black 6 at 1.
This starts to look like only one eye for Black. However Black 6 makes the 3-2 point a real eye, not a false one.

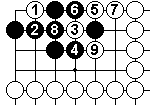
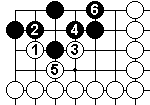
Black 2 is the obvious reply to this White 1. It just doesn't work,
although there are many ways both players can go wrong.
White 3 forces Black 4, otherwise White could play there and link to
either the lower or the right wall which would remove any eyes in the
centre.
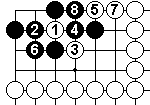
White 5 is not totally obvious as it appears to abandon White 3 -
however the shortage of liberties means that Black 6 can be captured.
And although White 7 at it 8 works (Black throws in, White recaptures,
Black ataris, White links 5 to his wall, Black captures, White re-enters
to atari, Black tries for ko, White falsifies the eye - again play it
out to see what is happening), it is quicker and cleaner to link 5 to
the wall with 7.
9 just makes the sacrificed White 3 a false eye.
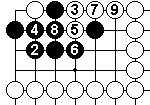
Black 4 tries to make an eye in the corner and one at the 3-2 point.
White 5 prevents this.
Black 4 at 7 leads to either a ko or a seki.
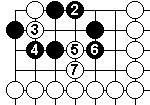
White 3 forces Black 4 and then Black just runs out of space for 2 eyes.
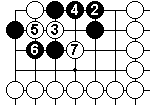
The sequence shown leaves Black dead with an internal 3-space eye.
Black 4 at 5 in this diagram leads to White capturing the top Black
stone and a single 4-stone T-big-eye.
Black 4 to the right of 7 is more interesting...
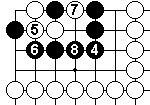
5 forces 6, and 7 captures to make a "gun" shaped group with two extra liberties inside black. That sounds like the a seki. But it is similar to the equivalent non-seki of Dia 3.
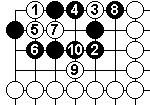
This is a seki and for a long time I felt it to be the best Black
can do given White 1.
Black 4 at 5 lets White kill.
White 5 at 7 lets Black live with 2 eyes.
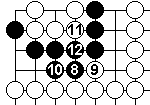 Continued
from Dia 10.
Returning to Dia 10 with a new improved Black 8. In this variation White runs out of liberties too quickly, and Black can now refute the original White 1 with territory.
This is only 9 diagrams for the one white attack, it doesn't even
cover every plausible Black 2. Many more variations are covered in the
file Diamond.go .
It does however show that Black can live, so White 1 is wrong.
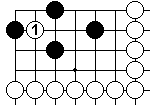
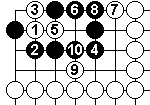
2 is forced, else White can connect to the lower wall leaving
insufficient space for two eyes.
3 is forced, else Black gets one eye in the corner and another at the
2-2 point.
4 is Black's strongest response, other Black 4s are worse. For example
if 4 at 5, then White 5 at 10 reduces Black to only the eye in the
corner. If 4 at 8, White 5 at 5 leaves Black a ko with 6 above 10.
6 to the right of 5 just doesn't work for Black...
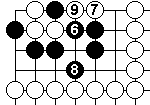
8 and 9 are miai and Black still dies, so he has to play as Dia 2.
Since that isn't what White is seeking, how about the other atari for 5?
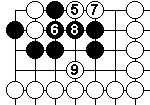
People's immediate reaction is that White 5 & 7 can be sacrificed because, as everyone knows , when Black captures the two stones White can throw in to falsify the eye. Except that isn't the case here!
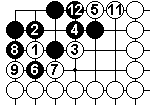 Black 10
at 1.
Black lives with 2 eyes.
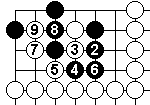
Black 2 is normally a strong move, but it doesn't work here.
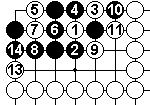 Black 12
at 3.
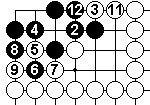
There are a couple of possible alternatives for White, but all seem to end with Black getting two eyes.
Despite the 24 diagrams, this page only covers part of the problem. Although some may be unlikely moves, we need to investigate moves such as left of 1 in Dia 1 and right of and below E in Dia 2.
This problem does have a solution and I'll go through that in a later month.
Home >
Steve >
Go >
Problem of the month
British Go Association
Last updated 2004-08-10
This page is part of http://www.stocton.org/
Email: webmaster@stocton.org