Home > Steve > Go > Problem of the month

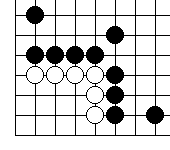
In a recent tournament, a West Surrey club member arrived at this corner position. It is slightly bigger than a "Carpenter's Square" and was named the "Lumberjack's Rectangle" by Reading Go Club.
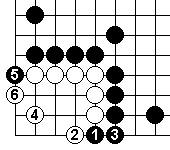
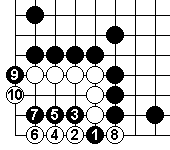
This shows the "tidy" set of moves. Is it naïve of White to expect this?.
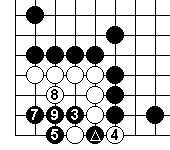 6 at
6 at ![]()
This shows what could happen with an aggressive Black and a trepid (?) White. Disaster for White.
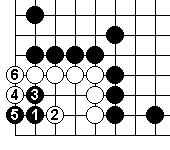
Which lets White live easily. Black can cause more havoc than this.
Having investigated this in the past month, I have concluded that this problem is non-trivial and that I am unable to provide a full answer this month. I will present my findings so far - they may be incorrect, feel free to let me know any errors - and I'll come back to this problem in a few months time.
Let us start investiagting the hane on the long side. Diagram 3 showed what can go wrong if answered recklessly.
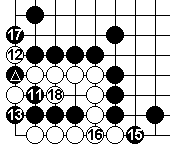 14 at
14 at ![]() .
.
Some dan players suggested that rather than capturing Black 1
directly, running along the first line might help. In this example here,
it appears to - the result is a seki.
But ...
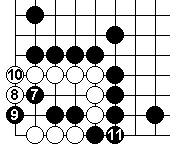
Black 7 is strong.
In this particular sequence, White cannot atari the Black stones, whilst
Black can capture the 3 White stones on the edge and connect out. This
kills White.
Assorted variations on White 8 et al exist, all leave White dead.
I conclude that answering the hane like this is bad for White.
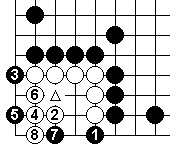
Answering at the 2-3 point seems a better move. Here White lives
with one eye at ![]() and one from capturing either 5 or 7.
and one from capturing either 5 or 7.
So far every Black attempt to kill after this White 2 has failed.
I also think that White 2 at the 2-2 point works - not yet fully investigated.
These five diagrams show moves which have been confirmed by GoTools as leaving White alive. They may not be optimal, but they do work.
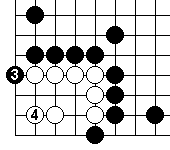
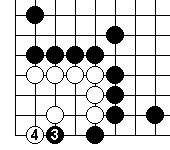
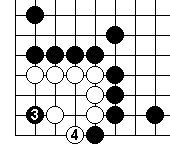
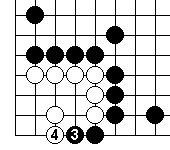
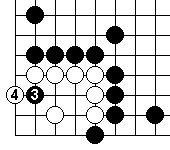
I may come back and add a diagram or two to this "long side
hane" page later.
I will address other Black attacks including the short side hane and the
2-2 point in future months.
Home >
Steve >
Go >
Problem of the month
British Go Association
Last updated 2004-08-10
This page is part of http://www.stocton.org/
Email: webmaster@stocton.org