Home > Steve > Go > Problem of the month
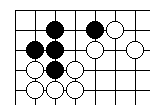
It is surprisingly easy to get this wrong.
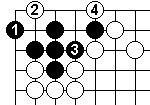
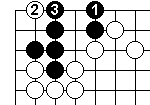
2 is forced else Black gets two eyes immediately.
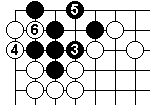
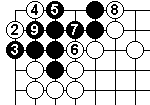
3 enlarges the eye space, but 4 reduces it to the four stone dead T-shape. (If Black plays to the left of 4, White 5 does not start a ko, but links to protect 4.)
Seeing the problem 4 caused in diagram 2, why not play 3 at 4 to widen the eye space in a different fashion?
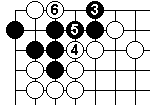
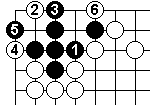
4 makes miai of 5 & 6 for White to to kill by "nearly" filling the space with a dead T-shape.
(It is possible for White to play 4 at 6 to kill immediately, but somehow I reckon this is cleaner.)
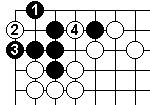
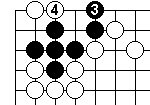
2 reduces the corner to one eye. 3 is "forced" to keep even that single eye. This lets White 4 remove the second eye at the top.
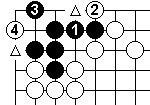
4 links out. 5 tries to form two eyes at the 2-4 and 1-3 points. 6 falsifies the 1-3 point eye. ( 5 and 6 are miai.)
The 2-1 points don't work, so Black has to try something else.
3 could attempt to separate the space into two parts. This is one way.
4 threatens a link to 2 (it will fail to bring 2 out but will make a captured 2 into a false eye). (The 4, 5 exchange could be omitted without affecting the result here!)
The other method of separating the eye space by playing 3 to the right of 3 here fails when White 4 descends to the edge to falsify the potential eye this 3 has made. (If Black 6 links then White 7 ataris.
4 prevents the space being separated into two eyes falsifying the eye at the 2-4 point.
2 undoes the achievements of Black 1, 4 is forced by 3 and then the two triangled points are miai for White to kill.
The attempt by White to kill with 2 fails to Black 3.
It has been suggested that this White 2 might at least convert Black 1 into a seki, but Diagram 10 shows that Black 9 ataris the white stones safely. White is one move behind.
Home >
Steve >
Go >
Problem of the month
British Go Association
Last updated 2004-08-10
This page is part of http://www.stocton.org/
Email: webmaster@stocton.org