Home > Steve > Go > Problem of the month
Some people get confused when asked What is the status of this
group? and respond Whose turn is it to move?.
With a status problem the answer is what happens if Black plays
first and also what happens if White plays first. Three simple responses
for a Black group being attacked by White are:
Obviously you then get more complicated options such as Black can live with a gote seki and White can kill with a two step ko.
This all leads on to this month's problem based around the well known situation where ...
This is something that everybody ought to know. This month's question is to see if you really know it. Dan players ought to be able to answer immediately. 30 kyus may need to sit down and work it out.
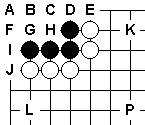
All you have to do is provide the answer for each of the possible Black attempts to live (A .. L). For example you may think that the correct response to Black A is White at I. Some Black plays have more than one response which works (maybe you think E can be answered with I or F). Some may need no response (maybe K needs no reply, so use P for Pass as the reply).
So you might get answers as follows:
A  B  C  D  E  F  G  H  I  J  K  L
I  D  I  E  IF I  L  I  K  E  P  P
Having done all that, the real question is to identify how you worked the answers out - what the obvious shapes are, what moves to try first etc.
The key to these life and death problems (as seen from the attacker's point of view) is usually one (or more) of
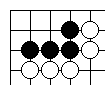
Note that when we talk of the eye-space we mean the empty points that will be left when the defending player finishes all his walls. In this case, the eye-space is a 3 * 2 rectangle.

This is achieved by assuming that both Black and White descend to the edge of the board to finish their walls off. Black can't make his space bigger with a hane since he eventually has to return and connect.
 White 2 tenukis.
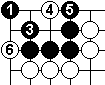
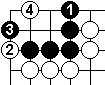
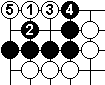
This absurd attempt by Black to live leaves the five point gun-shaped large dead-eye (hereafter referred to as the gun) shown in diagram 5. You would therefore be forgiven for playing at the marked point in diagram 4.
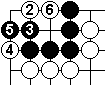
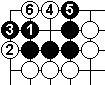
However that answer is the wrong one since it fails to take sente. The correct answer is 'P' (for pass) as demonstrated by diagram 6 in which 4 and 6 may not be exchanged.
4 is a threat to worm out of the corner, and so must be answered at 5, leaving a three-in-a-row eye-space with its central point filled - IE it is only one eye. 6 reduces the other eye-space and so prevents a second eye.
Moves 1, 3 and 5 are all bad as none of them work (unless a ko threat) and Black should play elsewhere.
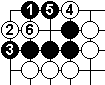
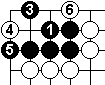
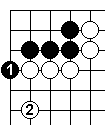
This Black 1 is a good attempt to live. Playing 1 leaves a five-in-a-row eye-space.
In diagram 7, White tackles this by playing 2, a threat to worm out at 3, forcing Black to prevent it by playing 3 himself. White 4 reduces the eye-space by one point and Black 5 prevents this becoming a reduction by two points. White 6 then returns to play the second central point of a four-in-a-row eye-space - Black is dead.
Note that in the introduction to this problem, I mentioned killing by creating a large dead-eye space and taking the central point. That is a mis-phrasing and what is really required is the ability to nearly fill the eye-space with a large dead-eye. 'Nearly' meaning fill it with that shape with one extra liberty. If there are two extra liberties, it is usually a seki. Here White can 'nearly' fill the eye-space with a three-in-a-row shape.
White 2 and 4 must be in that order. If White tries 4 first, Black lives as in diagram 8.
The answer is 'F'.
White 2 is the centre of a gun, Black is dead. If Black persists at either 1-2 point, White replies at the other 1-2 point.
White may also play on the left of 2, but only as a sente worm threat, and must return and play 2 to kill, so 'F' isn't efficient except when used as a ko threat.
The hane at ' I ' leads to a ko. I haven't bothered with this diagram.
So the answer is 'G' and arguably 'F', so I'll write 'FG'.
In diagram 10, the hane of White 2 leaves a gun, the centre of which
is taken by White 4. Black is dead.
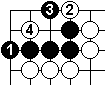
In diagram 11 an alternative approach is possible, White taking the
centre two points of a four-in-a-row eye. (5 and 6 are miai.)
Additionally, 'F' and 'G' both kill, diagrams omitted.
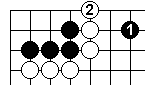
The answer is 'BFGI'. Note that Black 1 here is a threat to link out to a Black stone at K. Fortunately there isn't one in this problem.
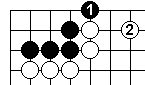
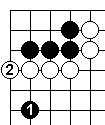
The Black hane of 1 ('E') has no impact on the corner. So White should stop Black escaping with 2 ('K') and sort other Black moves out as described in the other diagrams.
The answer is 'K'.
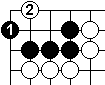
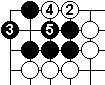
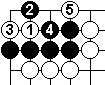
Black 1 leaves a gun. White 2 takes its central point.
The answer is 'B'.
White 2 and 4 may be played in either order. White ends occupying the central two points of a four-in-a-row eye.
The answer is 'C' or ' I '.
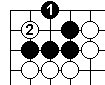
 White 2
elsewhere.
White 2
elsewhere.
Another absurd attempt to live by Black. The correct answer here is another Pass ('P').
Dia 16, ( White answers at 'D' ) reduces Black to a gun. In dia 17 ( White at 'G' ) White 5 removes the second eye. Dia 18 ( White at 'B' ) leads to a bent four in the corner and is not quite as satisfactory as the other two methods. Also 'C' kills, no diagram shown. Therefore the answer is 'BCDG'
As with the other hane at 'E', this move has no effect on the inside of the corner. Thus White should just prevent linking out. The answer is 'L'.
These moves are threats to connect out. All White needs to do is
prevent the connection.
White could answer these moves by playing to keep the corner dead and
prevent the link to the outside later - this seems unnecessarily
complicated.
A Black move 1 further away from the corner than 'K' and 'L' act as similar threats, and can be answered in the same way.
'K' is answered with 'E', and 'L' with 'J'.
The answers we have therefore are:
A    B    C    D    E    F    G    H    I    J    K    L
P    F    FG   BFGI K    B    CI   P    BCDG L    E    J
I usually get a couple of emails each month from people 'out there'
discussing the problem. This month, having asked for answers, I got
none!
Of people asked at the West Surrey Go Club, most managed to kill the
group correctly but failed to spot when pass was the correct
response.
In most of these situations, the easy answer was to make a gun big-eye.
Home >
Steve >
Go >
Problem of the month
British Go Association
Last updated 2004-08-10
This page is part of http://www.stocton.org/
Email: webmaster@stocton.org