Home > Steve > Go > Problem of the month
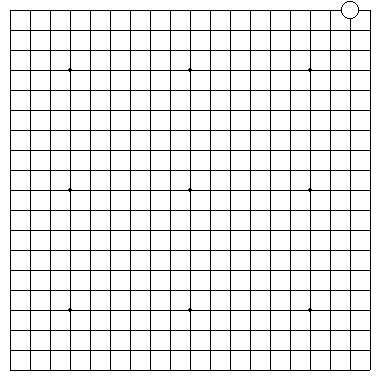
This problem was presented by Brian Brunswick at the West Surrey Teach-in and Tournament weekend earlier this month. The objective is for Black to capture the solitary White stone and for White to make it live. It doesn't matter what happens to other stones of either colour.
It seems at first glance that this is trivial for Black. It isn't.
I don't know the answer to this, so I am just presenting my thoughts so far...

We can assume that any move which permits the white stone to connect to the centre of the board will result in the stone living. Thus any black move in columns T or S will fail. Eg, if Black plays at S, White will hane to the left and either run along the second line or manage to reach the centre of the board.
Equally if Black plays at Q, or further away, we know in a normal game that White can invade at the 3-3 point and live. I assume here that this includes living the white stone.
If Black plays at R, white can reverse monkey jump up to the second line on the left and escape to the centre that way. I have no proof of this, but I therefore consider that the shoulder hit above R is Black's only possible move.
When I tried this as White against a dan player, I failed despite his Black being further out than I said. But then I didn't respond with a reverse monkey jump...


In Dia 3, we see that White can't jump immediately.
In Dia 4 we see that Black can't hane immediately. (There are other equally simple sequences.)
In Dia 5 we see that White can't jump after one extension.

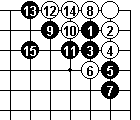
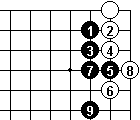
With the hane at Black 5, we see White 6, the cut, failing. Even if White tries a different move 8 (Dia 7) it still fails.
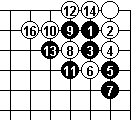
15 at 8.
In Dia 7a White sacrifices 6 and 8 to permit an escape along the top. After this, Black can't contain white - or at least not without allowing a second eye at the top.
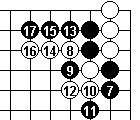
But Black finds a counter sacrifice in Dia 7b with 9, and by 17, Black can find more liberties at the top and right than White has in the corner. So Black can start picking White off.

So White tries a clamp instead. And Dia 8 shows that Black can't descend to the edge.
The result of all the failures above seem to suggest that Dia 9 is the key option. Here White has one eye in the corner and we have a race down the right edge of the board. Can White get a second eye or get up to the third line? Can Black keep White down to only false eyes? What happens when the bottom right corner is reached?
I leave this as January 2005's problem where other possible Blacks 5' at 6, 7 or left of 6 are pondered.
.
Home >
Steve >
Go >
Problem of the month
British Go Association
Last updated 2005-01-14
This page is part of http://www.stocton.org/
Email: webmaster@stocton.org