Home > Steve > Go > Problem of the month
I have said before that I sometimes find even the answer diagrams in books difficult. This is obviously related to ones grade and reading ability.
Therefore this month I am posting three related diagrams from a Yang Yilun problem, with diagrams from his answers. I would be interested to find out at what strength the "problems" become trivial. For what it is worth, I (3 kyu uk) find:
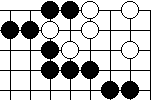
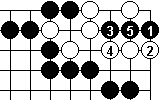
I imagine you all realised that Dia B1 is one pair of moves further on in the answer from Dia A1. So why is it Dia B1 is easy and Dia A1 hard?
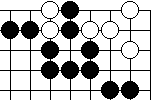
Anyway problem B first. It is obvious that white can live if he plays at the right 2-1 point, thus unless it fails for some reason yet to be discovered, that is the answer.
If white plays 2 on the right making at most one eye there, Black answers at the 1-4 point removing the top eye.
If white plays at the right hand 4-2 point, preventing the black stone connecting out and thus guaranteeing the right side eye, Black again plays at 1-4 to remove the top eye.
The only problem is if white plays at 1-4 to make the top eye and threaten both the right eye and the capture of the two black stones. In this case the 2-1 stone must connect out at the 3-1 point. The 4-2 and 4-1 points are miai and black can connect to his 5-2 stone. Thus White will capture the two stones at the top. But Black recaptures at 2-5 and there is no second eye at the top.
I have deliberately done this in words rather than as a diagram in the hope that forcing you to picture the stones will be more meaningful. If it doesn't work, play it out on aboard.
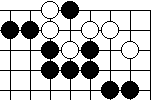
Now for problem A. Once you know hte answer to problem B this is also trivial. But when you come to it cold there seem to be too many points to consider - I end up perusing the 2-1, 1-2 and 2-2 points and for some reason don't see the obvious 2-5 capture and rescue of the first line black stone.
And lastly, problem C. Again the right 2-1 point works. If White blocks at 2-2, making one eye at 1-3, then Black replies at the 3-1 point denying the second eye. There is no second eye since either Black connects out or Back throw-ins reduce the 'second' eye to nothing.
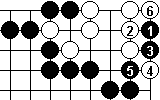 Black 7
at 3.
Black 7
at 3.
And if White blocks at 3-1 then white has the nifty sequence in Dia C3.
Home >
Steve >
Go >
Problem of the month
British Go Association
Last updated 2004-08-10
This page is part of http://www.stocton.org/
Email: webmaster@stocton.org