Home > Steve > Go > Problem of the month
The British Go Association provides various aids to help clubs teach beginners. One such aid is a series of cards with one problem on each. At the West Surrey Go Club, we are going through these cards with the beginners and also investigating other interesting situations which result from them - even if not directly related to the BGA's question.

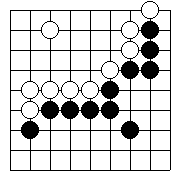
BGA: " Black has a chance to capture one or more white stones. How? "
Move 1 for Black in the above question is fairly obvious. This month's problem is to investigate the various follow ups to determine the best set of moves for both players - are the obvious moves best or do pushes, sacrifices and kos give a better result (for either player).
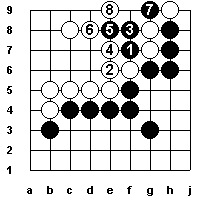
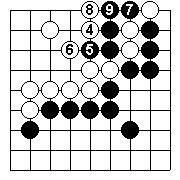
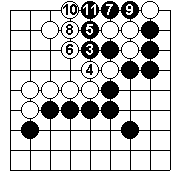
1 & 2 are obvious, 3 & 4 are sensible, 5 pushes and 6 responds, 7 is necessary and 8 tidies up the border but may be left till later. This is therefore gote for Black.
Using this sequence as a reference and counting territory in lines 6 thru 9 we have: White = 13 (White has to fill left of 8), Black = 10 (3 prisoners and 7 territory). This is a white lead of 3 points locally.
With the reference sequence as shown, Black plays first and White
last so this is a sente sequence.
It is likely that White would omit 8 to take sente - this turns the
sequence into gote for Black but leaves Black the option of playing to
the left of 8 in gote again to reduce White's local 3 point lead by 2
points (c9 and f9) to a 1 point lead.
The following diagrams will be compared to this 3 point lead, including catastrophic moves by both players to warn of how not to play here. The situation in the lower half of the board is mainly being ignored, as is any ko fight for 1 point in the top right.
Or why move 7 in the reference sequence is necessary.
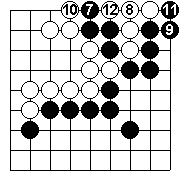
Black runs out of liberties after White connects with 8. This means his attacking stones are caught.
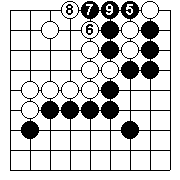
White ends up with 14 points to 10, so White is better off by 1 point and Black is definitely in gote here.
Again if Black takes sente elsewhere instead of playing 7, White
could play at 7 in gote for 1 more point or at 7 and then 9 in gote
squared for two more points.
What is the correct term for two gote sequences in a row? It
presumably isn't double gote since "double sente" means
something totally different.
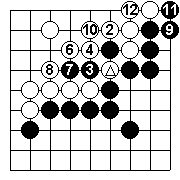
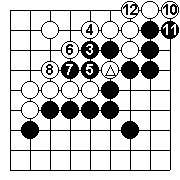
By playing 4 here, White can get the benefit denied him by Black's push at 5 in the reference sequence. 14 - 10 = 4, 1 better than the reference.
Black 9 is gote to keep 1 point which would be lost if White 9 forced a Black connection below 7.
This isn't worth a diagram, the end result is the same is Dia 5.
If Black pushes with 3' at 5 (in Dia 5), White plays 6. Then Black at 3 and White at 4 leads to the same result.
This leads either to catastrophe for Black or a result equal to the reference.
 5 at
5 at ![]() .
.
White 14, Black 3 (2 territory + the marked prisoner). A local lead for White of 11, 8 better than the reference.
 13 fills at
![]() .
.
And White gets 12 to Black's 3, a difference of 9 which is 6 worse than the reference for Black though two better than the previous diagram for him.
 9 at
9 at ![]() .
.
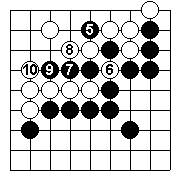
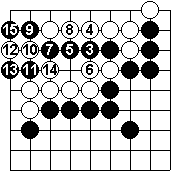
Dia 11 - Black extends then White protects the cutting stone - has W=12, B=12, a local difference of 0. Therefore this is 3 better for Black than the reference - so White plays 4' as Dia 12.
Dia 12 - Black extends then White protects the upper right stones -
has W=14, B=3 (2+1), a local difference of 11. This is 8 better for
White than the reference.
Since this is so much better for White than Dia 11 (or the reference) if
Black is to play this way, he must find a better move 5.
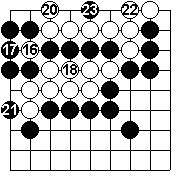 19 at 16
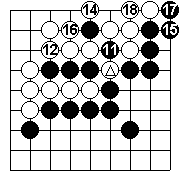
This alternative Black 5 followed by White connecting his threatened border stone leads here to every White stone on the board dying. White needs to find a better 6'.
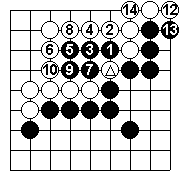 Black 11
at
 ![]()
This White 6 leads to White=12, Black=3, a white lead of 9. This is 6 points better for White than the reference but is Black gote.
Black can't play 7' at 8 as White will not play 8' to link under, but will play 8' at 7, cutting Black's group off completely.
We have looked at several variants:
This page used to have a very different Dia 15. Jim Cox pointed out in May 98 that White 6 there was good. I used to reckon that Dia 5 was optimal. It's a very different result now!
I conclude that Dia 9 is as good as it can be for both players. I suspect that I would not have found this in a tournament game.
Of course with a problem as involved as this one, I could easily have missed something. If I have, please email me your comments.
Home >
Steve >
Go >
Problem of the month
British Go Association
Last updated 2004-08-10
This page is part of http://www.stocton.org/
Email: webmaster@stocton.org